A lot of people don’t care enough to, or just don’t know how to adjust their cabinet doors so that they are perfectly flush, level, and aesthetically pleasing. As long as the doors work properly when they’re opened and closed and don’t rub on anything, some people are fine with them being slightly misaligned.
While this generally isn’t a problem unless you get close enough to the cabinets to notice a gap between the doors or a slight drop where the doors meet each other or the cupboard, this can be a deal breaker when it comes to some people buying used cabinets. Whether buying or selling you can use your own knowledge of how to fix the slight problems associated with hinges to your advantage.
When buying a set of used cabinets you can use these minor flaws to lower the price even more, especially if the person selling them has no idea how to fix it. When selling; you can do this maintenance beforehand to make your cabinets look even better to the buyer and you may be able to fetch a slightly higher price.
Fixing misaligned cabinet doors is as easy as knowing which screws on the hinges do what, and being willing to put in a little time since you may need to readjust the same door a few times to get it just right.
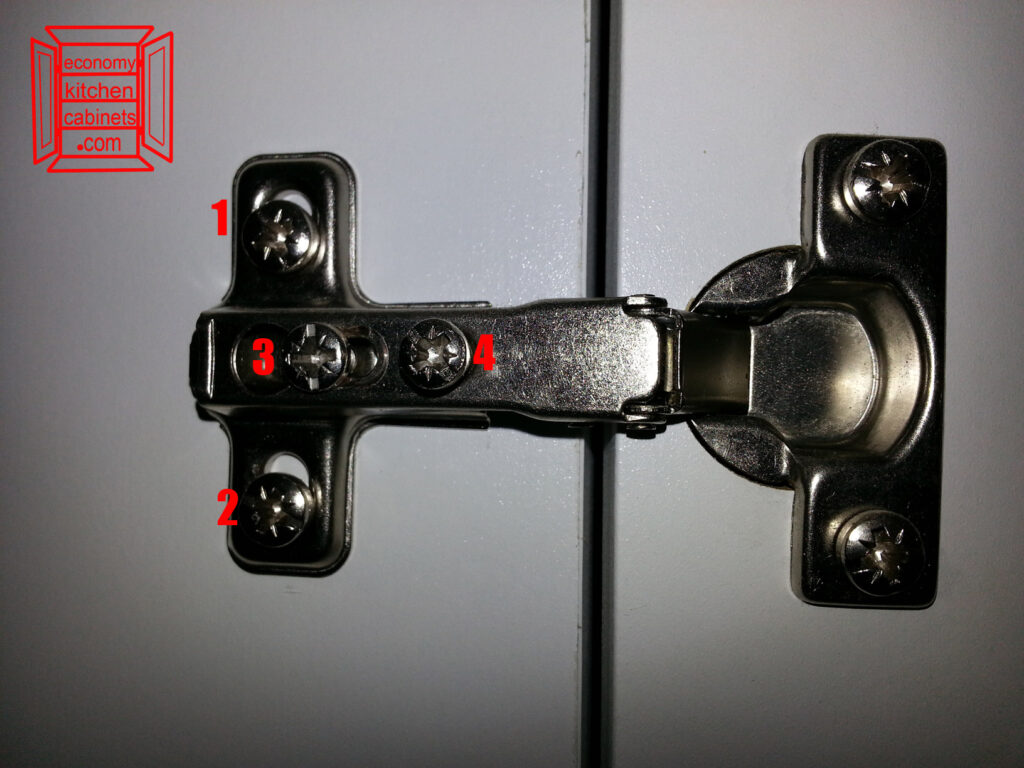
European cabinet hinges, also called concealed hinges are used quite often these days as many people prefer not to see a lot of their cabinet hardware if it can be avoided. As you can see from the picture there are four screws that you can use to adjust your doors to solve problems such as the doors banging together, being too close together, too far apart, misaligned at the top and bottom, rubbing against the cupboard, or not sitting flush.
The next section of the article will explain what each screw does and how to use it to realign your doors.
You can use this photo with the descriptions below to properly adjust your European cabinet hinges. In the photo, the cabinet is on the left, and the door is on the right side. Note that you only need to adjust the cabinet side screws to fix the problem with your cabinet door.
Screws 1 and 2
Loosening these screws will allow you to move the door up and down. Usually you will have to loosen the 1 and 2 screws on all of the hinges on the door at the same time in order to adjust it easily. Being able to move the door up and down will allow you to line up the tops of the doors to each other and the cabinet so that everything looks level.

Screw 3
Loosening screw 3 will allow you to move the entire door or just the top or bottom section of it in and out. It can also be removed so that you can take the door off. Adjustments using this screw can be fixes for the door rubbing against the cabinet when opened, the door sitting too far from the cabinet, or anything requiring you to remove the door completely.
Screw 4
This screw moves the hinge piece that is attached to the door further away or closer to the hinge piece attached to the cabinet. This can fix any gaps that there might be between the cupboard doors.
A very simple fix to an incredibly common problem that most people either don’t bother doing, or simply don’t know how to do. Just by knowing which screws to adjust and being willing to try a few times to get it right can make a huge difference in how your cabinets look. Knowing little tricks like this can allow your renovation to be put on hold a little longer while you either save the money needed, or look for a better deal, since your old cabinets will look a little better. If you want to make sure that your cabinets are in tip top shape for selling, also check out our guide on how to lubricate your drawer slides to eliminate another common, easy to fix problem.
If the problem is more serious than can be fixed with the instructions above, the hinges can be replaced quite easily and you can get them from Amazon here


